
I like to think of mapping the egg as the framework on which the design is placed. The more balanced the framework is, the nicer the result will be. You want to get your sections evenly spaced so the design doesn’t look skewed or off-balance. This is why I use a small section of cloth measuring tape.
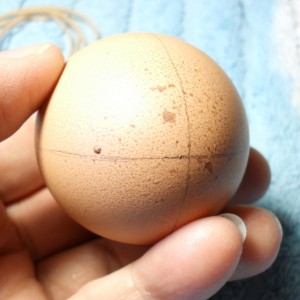
However (now that I’ve gone all OCD on you), we are going to eyeball the first two divisions. Hold the egg with the small end pointing up to the ceiling, center it in your field of vision, and find the topmost peak of the egg. Visualize the curve against whatever background is behind the egg (if you can hold it against a dark background, it is easier to see), and find the center. Make a mark at the apex. Turn the egg upside down and do the same on the bottom of the egg.
Referring to your design instruction sheets, make your divisions joining the marks – attempting to divide the egg in half evenly. Pencil lightly, because you are going to measure afterward to be sure the lines are even (and you may need to erase). Be aware of the outer edges of the egg, to assure the line goes straight down the middle.
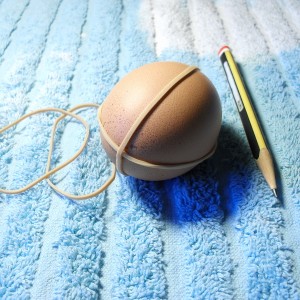
Do the same for the second division. The egg should be divided into four long sections. Like sectioning an orange. You can check it with the rubber band marking method shown above. It’s hard to draw under the bands, but it’s easier to see where your lines are and assure that they are even.
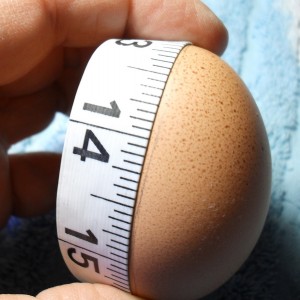
Now measure for symmetry. Pick a number on your measuring tape and hold it against the top mark on your egg with your index finger. Hold the top in place, and align the tape down one of the division lines, smooth the tape down to the bottom mark, keeping it straight and flat against the egg. A common egg will measure about 3 inches and change.
Remember the measurement (usually something like 3-2/16″) so you can compare it to the next vertical line length. Turn the egg a quarter turn and measure the next vertical line, again marking the center point. Confirm that the length of your vertical line is about the same (3-2/16″). Repeat until all vertical lines are relatively even. It is OK if the vertical lines are a couple of 16ths off. It means that the apex or the bottom points are not exactly centered, but it won’t be noticeable. If they are as much as 1/4″ off, though, this will be pretty obvious. You may want to erase and re-draw the lines.
The old carpenter’s adage “measure twice, cut once” can be applied here. Except don’t cut your egg.
When you have all your vertical lines in order, mark the halfway point at the middle of the egg, on all four division lines. Turn the egg on its side and connect those center marks to make a line around the center of the egg like a belt.
This was the hardest part – getting your first mapping lines straight and even. The rest of the design should fall into place after this.