
Egg decorating supplies can be ordered online. The following is a list of supplies, and direct links to purchase online. All items on this list are personally used (and recommended) by me.
This article contains affiliate links. I receive a small commission for purchases made through links in this post.
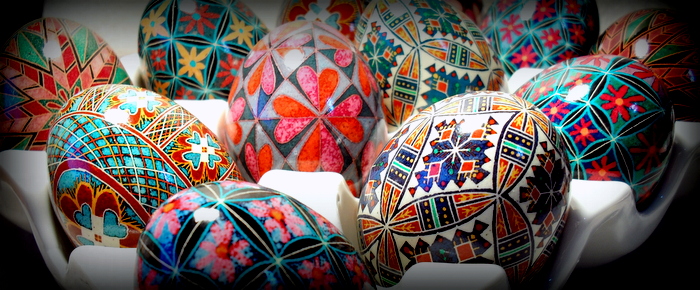
If you don’t want to shop around, here is a good starter kit complete with dye, the dark beeswax that I prefer, kistkas, and an instruction sheet.
What you will probably need to buy:
Analine Egg Dyes. Analine dyes are recommended for their intense colors, pre-measured packets, and ease of use. They mix up easily with distilled water.
Electric Kistka (wax pen) This is the one I use regularly. (I do not recommend the kistkas with the interchangeable tips. It is difficult to change out the hot tips when you are working.) Fair warning, these are hard to find and often out of stock at Amazon. The electric kistkas can also be purchased online at The Ukrainian Gift Shop.
Note: While I prefer the electric kistka, I do realize that it is a bit expensive. If you want to start out on the candle-warmed kistka, I recommend the Delrin Kistka set. There are three tip sizes that you can easily tell apart by the color of the handle.
When using the Delrin kistka, you will also need a candle or small oil lamp with an exposed flame to melt the wax.
Spaghetti style Beeswax. The string-style wax is much easier to use than the blocks of beeswax. And the dark color makes it easier to see on the egg. That small package will last you a long time.
Blas-Fix style one-hole egg blower. I’ve tried them all, and this Blas-Fix is my favorite. They are hard to find, but that link goes to the same style.
Wide Mouth Mason Jars pint size. If you get them at your grocery store, be sure and get the wide-mouth style.
Pentel white polymer eraser. These non-abrasive erasers will remove the pencil lines without scratching the eggshell. I use the click-pen style. But any of them are fine.
Naphtha. Caution – Flammable! For removing the wax. This is the brand that I use, but it is expensive to buy online. This brand is also available at most hardware stores (Home Depot, Lowe’s, etc) in the paint section.
Minwax Polyurethane fast drying satin finish, (get the mineral spirits cleanup type – do not get the water-cleanup, it will run your dyes). You can get the small pint-sized one. Also available at hardware stores.
Dremel Electric Rotary Tool. If you have one of these around the house already, be sure it will hold a small-shank bit. I use the Dremel brand, but any high-speed rotary tool will be fine (Black & Decker also makes a good one).
High Speed Cutter bit. The cone-style diamond chip surface bits will also work. This is for making a nice neat hole in the egg without cracking around the edges. It needs to make about a 3mm hole in the bottom of the egg. You can find these in the small tool section at hardware stores.
Oral Irrigator plastic syringe.
Bamboo Shish Kabob Skewers. These are used for the final varnish. They suspend the egg in space, only touching the inside, so the final varnish dries with a smooth finish.
And, you probably already have these around the house. But just in case, you will also need:
White Vinegar
Distilled Water
Table Spoons
Jar of rinse water for the spoons
Tissues (plain – no chemical additives)
Newspapers, or other table protection
Good working light
Pencil, hard lead (#2HB)
Paper Towels
Laundry bleach
A table to work on
The kitchen sink
Oh. Almost forgot – you’ll need eggs. Free-range or local fresh eggs are best, but not always available. If you buy them at the grocery store, here is an article about choosing a ‘good’ egg.