
There are many ways to varnish an egg. Some people prefer the spray varnish, some brush it on, some simply rub it on with their hands. I use a combination of the rub-on technique and one I developed myself which I call the ‘Stake Method’. The Stake Method allows the finish to dry without any contact and results in a nice smooth coating with no fingerprint smears, or notches from a holder.
You can use regular varnish or polyurethane. I prefer the varnish because it results in a harder, thicker finish. Marine varnish is the best, although it does tend to yellow over time. Be sure you purchase clear varnish, you don’t want any tint in it. You will need at least a quart size so you have room to lift the egg in and out of the can.
Materials you will need:
click on the titles to view these items on other websites, where you can read more about them, or purchase them if you like.
- ROTARY TOOL
with a drill point.
- BLAS-FIX EGG BLOWER
- MINWAX CLEAR SHIELD
Or other clear varnish (quart size).
- DRYING RACK
- BAMBOO SKEWERS
- Styrofoam block
- Clear bin
So. You have completed the design on your egg, and are ready to empty and varnish it.
Before I empty the eggs, I rub them with them a thin coat of varnish. First to to preserve the design if they are dyed eggs, and then to add a little bit of strength to the shell while I am abusing it and trying to drown it.
The rub-on technique is widely used, and you may already be familiar with it. In a nutshell: Dab a little bit of clear varnish into the palm of your hand, and roll the egg around your palm until it is completely coated. Then set the egg on a drying rack (simply made with small nails pounded into a thin plank of wood – the egg sits on the pointy ends). Let the varnish cure overnight.
To clean the varnish off your hands – rub them with plain vegetable cooking oil and then wipe it all off with a paper towel.
Next, drill a small hole with your rotary tool (Dremel), and use your egg blower to empty the egg, following the directions on the package for your egg blower. At this point, I inject a small amount of regular laundry bleach into the egg, shake it up, and rinse it again. This disinfects the inside of the egg.
Set the eggs back inside an egg carton, hole side down, to drain. Let them dry completely, occasionally dabbing the hole with a kleenex to wick any residual water that gathers at the hole.
When the eggs are completely dry (this should take at least a day, and 2 days is better), you are ready to apply the final coat of varnish.
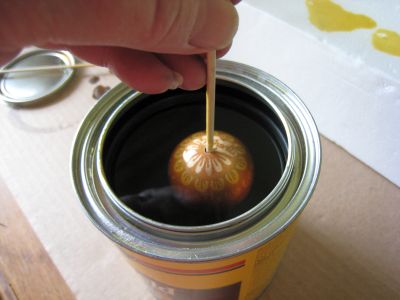
Open your can of varnish. Insert the blunt end of a bamboo stake through the hole of the egg. Dip the egg down into the varnish, stopping just short of covering the hole. You do not want the varnish to get inside the egg, so leave a little void around the hole.
Using another stake or a wooden popsicle stick to support the egg, slowly lift out the egg and turn it upright. Let the excess varnish drain back into the can until the dripping slows. The more you can drain off at this point, the easier it will be for you during the curing process.
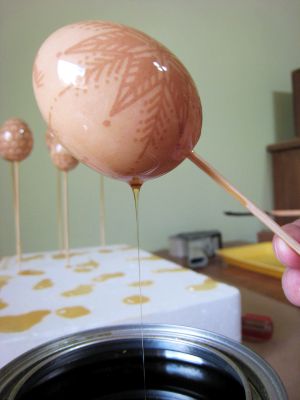
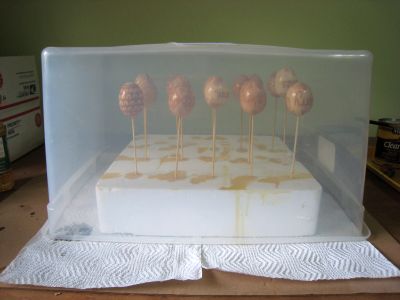
Turn the egg straight up and stick the pointy end into the chunk of styrofoam. More varnish will drip down the stake and may travel down through the styrofoam block to the table below, so be sure and protect your surface. I use a flattened cardboard box placed underneath the block.
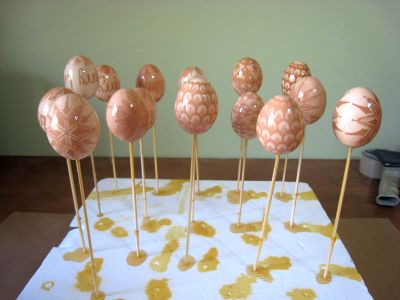
When all your eggs are planted in the styrofoam – all pretty like an egg garden – cover the batch with a clean clear bin. This will keep dust and cat hair from sticking to the varnish while it cures.
During the cure time (at least 2 days), you will need to spin the eggs a few times so they do not glue themselves to the stake. Use the pointy end of a bamboo stake to turn the egg gently on the stick and loosen the seal at the hole. You should do this at first after an hour, and then again after another hour. By that time, it will have hardened enough so the egg spins freely on the stake.
If they do manage to glue themselves to the stake, you can run a razor blade around the base of the egg where the stick enters the hole, to loosen it.
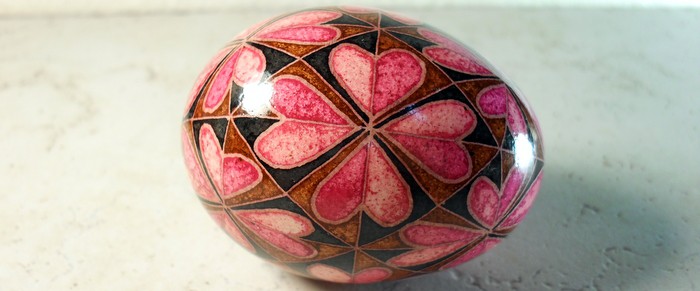
Note: I use this varnish technique for both my vinegar etched eggs and for my dyed (batik) eggs.
Hint: When drilling the hole in your egg, be sure to make the opening large enough to accommodate the bamboo skewer. Have a skewer handy to size the hole.